After Action Report (08.10.2005): 'Thirty Years War Quad - Nordlingen 1634'
Seow Buay and I rolled a die for sides, giving me the Swedes and him the Imperialists. We quickly set up given the limited number of units. We were all set to go!
Nordlingen, as everyone knows (well..), is a pivotal battle in the Thirty Years War which broke the back of Swedish power and restored the advantage to the Imperialists. The Swedes did manage a revival late in the war.
On the armies, the Imperialist army was larger but more coherent while the Swedish army generally had higher unit strengths but were divided. Given the state of the fatigued Swedish forces, the demoralisation level for this battle is set at 100 and 75 for infantry and cavalry while that of the Imperial forces is set at 125 and 100 respectively.
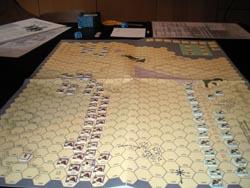
A examination of the battlefield showed a central division by rough terrain and impassable woods into two parts. For both the Swedish army and Imperialist army, the majority of their armies would be deployed on side closer to Nordlingen. It would be difficult for the armies to support the minor elements on other side of the divide. It was much more difficult for the Swedes actually.
 The initial deployment was a curious one. An advance Swedish detachment under Horn stood poised to attack an isolated imperialist hill with cannons while the two armies stood facing each other on a plain. The Imperialist cannons were mostly placed on high ground.
Given the tripling of factors given to Swedish infantry in turn 1, I attacked with most of Horn's forces, demolishing three out of four infantry units (5-3 or 5-4 units). Unfortunately, the two cannons units disrupted my powerful infantry units. Seow Buay swiftly moved substantial forces to counterattack. He did not waver and neither was he half-hearted. My tactical mistake from this point basically doomed the enterprise. I failed to position my 15-4 infantry units properly and thus did not rally them. I did a silly suicidal attack with a powerful unit. It was going to be a matter of time before the Horn detachment was lost. I had lost a wing there! It was obvious.
At turn 2, I moved my entire army forward, forsaking my artillery and attempting to threaten Seow Buay's army. However, Seow Buay was unconcerned. He simply denied his flank and deployed on high ground behind his artillery.
At that point at turn 3 to 4, I had to make a strategic decision. I could withdraw and await him, essentially waiting at my lines from a position of strength. This would also definitely end the game at this point as Seow Buay would not forsake his powerful position despite his superior numbers and the destruction of Horn's detachment (That would draw off about 30% of his forces up to turn 4-5). Seow Buay would end with a substantive victory at the minimum. I would have about 20VP and he would need 30 or more which he could more than easily have gotten from the destruction of the two 15-4, 13-4 infantry units, and not to mention the cavalry units.
 Anyhow, I decided to throw caution to the winds. I would try to force a decision. Either, I claw out a draw or lose my army. Using my 12-4 infantry units, I proceeded to try to punch through his centre. I managed to disrupt a few units but in turn, more than six of my units were disrupted by a combination of cannon fire and die rolls. Risky attacks. I managed to eliminate a few units but lost substantially more.
By turn 7, my line was beginning to collapse. Seow Buay had managed to reduce the Horn detachment to two disrupted units.
I started withdrawing to my gun line while Seow Buay's maruadering cavalry came around my short flanks. Through carelessness, I lost an artillery piece. At turn 9, my army was on its last legs, and the infantry was just short of demoralisation. At that point, we ended the game. Seow Buay had won a complete victory.
In hindsight, there were two major approaches for the Swedes to consider.
1. The withdrawal of Horn's units and the re-joining of the detachment with the main body. If this was chosen, the Swedish army could actually wait in a secure position for the larger Imperialist army. This was never the obvious choice as almost everyone would have attacked with Horn.
 2. Attacking with Horn and then holding the hill with the two cannons for a prolonged period while the main Swedish army attempt to attack left. (ie Imperialist right wing). This strategy appears viable. Again, the risk is not inconsiderable.
For the Imperialists, it would be mostly be the employment of a reactive strategy. Should option 1 be chosen, the Imperialists would have to decide whether it is worth advacing and abandoning a position of strength. The Imperialists have a preponderance of artillery on high ground. The Imperialists have numerical superiority despite lower strength units. And lastly, greater staying power through a higher demoralisation value.
Afterword
I think this is a worthwhile battle to play and I would love to play this again. We will likely be trying Rocroi next.
"Scientists have proof without certainty; Creationists have certainty without proof"
Ashley Montagu
10 comments:
Dudes! Play Age of the Empires 2. It rocks!
Silver.
But it's not Rocroi!
I also have 'Under the Lily Banners' which has yet another protrayal of Rocroi.
Breaking the Spanish tercios would be a challenge.
Besides Age of Empires 3 is due out soon! I can't wait.
Why do you persist in posting your ugly mug shot on your blog?
mischan.
Friend Kuo! Your friendly rudeness is unbecoming of you! We all know that you are handsome.
Friend Kuo: The Most Handsome of all Handsomes.
Friend Kuo, do put on your shroud. You will need it.
Hello, Friends,
I have played this battle at least two dozen times as either side and I have lost only once! I have never lost as the Swedes. When playing as the Swedes, one needs to send Horn's forces some help! You need to do it on the FIRST TURN - and DON'T be stingy! AT LEAST send four cavalry units from the main line right flank. You may send as many as six and/or two 8-4 infantry (through the rough with the infantry). The battle will boil over at Horn's Hill and those heavy infantry units there will do a lot of killing given they are properly supported. The rest of the army either SITS on the line with the guns OR echelons left (keeping the guns protected with open fields of fire). DO NOT come out in line and mask those guns. As mentioned in the replay, one does have to watch positioning.
Hi Brufrog,
I did not commit my units in the right direction and made the wrong strategic decision in the first turn. And afterwards, my poor tactical decisions doomed Horn's units.
I have forwarded what you said to my opponent and other wargamers that I play with!
You have given me a lot of food for thought. Thanks. I appreciate it.
Hello again,
The comments I made some days ago need some clarification. When I suggested that one can send two 8-4 infantry units, I did not make it clear that these units were in addition to the four (at least) must-send cavalry units. The other two cavalry units one could send are optional as well. One should send the low-rated leader along with the must-send units. The infantry units go through the rough terrain, the cavalry around the wooded hills, keeping out of the LOS of the Imperial guns as much as possible. Given that one sends six cavalry and two 8-4's, that is about the maximum one can send to help Horn. It is especially important that these forces arrive in time to help hold Horn's hill - DON'T send them anywhere else.
Yours,
Brufrog
Ahhh.... I see. I would be right to infer that Imperial Army would be constrained by having to guard its batteries deployed on the high ground? And the menance of an advancing Swedish army would be too much should it commit its entire army against Horn?
I was looking at Dodge's book which described this battle and noted the differences in the game map and Dodge's map. I have also noted a similarity of the map here and that in another volume.
Very interesting! I've the map and the counters... But not the rules. Do You know where we can find the rules into the web?
Marcos Souza
Post a Comment